Tuesday, 15 December 2015

Experiment No.1 - Phase II


I have created a video on the final product for my 'Digital Pinhole Camera'. This video includes what the body cap looks like on the camera, what it looked like before it was made into a pinhole and the body cap off of the camera. This experiment took roughly 30 minutes to create as I did have to drill a hole in the cap. After that the rest was simple. If I was to do this again I would experiment by putting your camera in strange locations, such as really close to a foreground object and by using a pinhole you can have almost a unlimited depth of field!

Planning Sketch


Here are some of the photos I have taken using my Digital Pinhole:


Contact Sheet


Experiment No.1 - Phase I


Digital Pinhole Camera

For my first experiment I chose to create a digital pin hole camera. The digital pin hole camera is made by putting a hole through a body cap and the attaching this ti the body of your digital camera and you can the create you images. As there is no lens attached to the camera body it means that you can't control focuser zoom. The only thing you have control on the camera is when you close the shutter and whether you use he flash or not. The measly amount of light a pinhole lets through makes it very hard to see through the viewfinder. On a bright, sunny day you can expect a good photograph by setting a one-second exposure at ISO100. Around dawn and sunset it may be hard to capture enough light in 30 seconds so you need to have a or sturdy surface to keep the camera steady and get the best quality photo. Since you can’t focus a pinhole, even the clearest image you create with one can never be described as crisp. Everything is equally in focus or even out of focus from right in front of the pinhole to the distant horizon. 


Here are a few example of a digital pinhole photos:


Friday, 13 November 2015

Analogue Photoshoot


After using and creating my digital pinhole to create the same effect as a film camera I decided to compare the difference in quality of images with the digital pinhole and my Praktica film camera. The image below was a image that was captured with my film camera and a problem occurred here that is very common with film cameras and it's that the image is underexposed and to make sure no images are underexposed or over exposed takes time and practise to understand the light balance and which shutter speed to use. Another problem I found with this image and actually with all of my images is that there is green streaks through the images and this annoyed me cause majority of my images on the negatives would have looked fine and usable without the green streak.


Here are a few images that didn't work and still have a surreal look to them as there a bit's missing or not fully developed.


Contact Sheet


Monday, 2 November 2015

Life Through A Globe


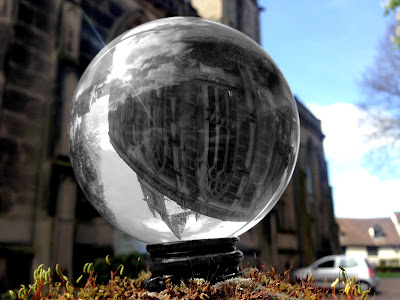
I came across this image while looking through Pinterest and it inspired me to try and create my own section on my blog called 'Life Through A Globe' where I experimented taking photos through a glass globe. Also by doing this I have been able to create a surreal photo as the image is flipped while looking through it and is making the world look upside-down. I was unable to discover who actually took this photo as it was only re-pinned on Pinterest who had found it online.
This photo however is not a example of surrealist photography as you can tell by the colour palette is not as bland as the a surreal photo would consist of.


Here is a photo which I have taken using the same style and trying to create the theme of surrealism. I have done this by dulling down the colour palette, I did this by changing the levels on the photo to make the darker colours even darker so it would give that feeling of surrealism. Also by having the globe in the centre of the photograph, it gives the image a focal point and will drew the audience's attention to the globe. Having a aperture of about f5.6 gave the blur around the globe and helps the globe more in being the focal point.


This photo again is using the sam style and giving the surreal feel to the photo as the image with in the globe is flipped. Again I have tried to dull down the colour palette to make it look more surreal as the image before hand was bright and slightly over exposed and wouldn't have represented surrealism. Using the globe it refracts the image/object behind it and will flip anything that is placed behind it and it is replicating what your eyes do. What you are seeing through the globe is what we would originally see but our eyes the flip that and you the are seeing the correct way up. I took this photo with an aperture of f5.6 to make the sphere the focal point.


My final image I have made two variations as I was unsure which looked more effective. I have used the same aspects as the other images, e.g. focal point on the globe and dulled colour palette but only in certain areas of the image but instead of keeping the image colours flowing I chose to isolate the colours with the globe and then the same but surrounding the globe. I prefer using this style of isolating colours in certain parts as it is another way of presenting surrealism and makes the stand out to the viewer. This image was captured using ISO 400 and f5.6 to give the blur to the background of the sphere.


Surrealism Essay


Surreal London


Surreal Underground


During my trip to London, I had to travel a lot and a majority of the time I was using the underground. This photo that I captured doesn't just look surreal but felt very surreal while taking it as London is and extremely busy area of England full of tourists, business workers and general citizens, but as I was walking down this underground walkway there was absolutely nobody down there at the time I took it. It made think is there some reason I shouldn't be down here, does everyone else know something I don't and really made me question the area.

This aspects that made this photo so surreal was the lighting was terrible and really dark, also the colour palette is extremely dull using browns and dark colours. Finally, it follows most of the conventions of a surreal photograph and makes it what it is. I also haven't edited this image at all and this is exactly how the image was taken, straight from the SD card. The photo is a one off photo and was the only photo that I took while I was walking as I didn't really want to hang around there for long because the area had quite and eery feel to it.

I have also tried editing this photo in a few different ways to get some different effects with it:


Here I have simply added a black and white layer over it, changed the levels and saturation a tiny bit and finally erased certain areas of the black and white layer which contained the most colours and it gave it this effect.


With this photo I again used something very simple and just add a black and white layer over the top and that's it. I haven't touched the levels or saturation as I tried changing them and personally I thought it ruined the photo.


History Of Photography Exhibition


During this half term, I travelled down to London to visit the 'History Of Photography' exhibition and the Victoria and Albert Museum. The exhibition was extremely informative and consisted of many famous photographers work.

In 1852 the V&A became the first museum to collect photographs. Its collection is now among the most important in the world and forms the UK's national collection of the art of photography. The works in the gallery highlights from the permanent collection. They represent a wide range of uses, processes and styles of photography from its invention until the present.


The photographs currently on display were all made as series and sequences. From start, photographers documented, edited and interpreted the world through groups of images. During the 19th and early 20th centuries, systematic surveys of buildings, landscapes and people were used to compare, classify and record. 


Series photographs enabled scientific observations, allowed multiple viewpoints and conveyed the passage of time. Today, photographic artists often use sequences to present a narrative or reveal subtleties of emotion.


Tuesday, 6 October 2015

David Hockney Inspiration


My Emulation Piece


I unfortunately had to just use one image and divided the image up in photoshop as when it came to doing my photo shoot on October 3rd the lighting one the day was incredibly bad and my images looked extremely dull. So when it came to editing these images I took the decision to chop the singular image up. Here is how I went about creating the image:


Firstly, I put the image into photoshop and started to section off the images used 20mm by 20mm square.


Each square would have been part of line situated on the photograph, so each line has been put into a group so that I knew with layer was which.


I then started to rearrange the squares in the style of David Hockney to try and create the final image ones again.


I then added a drop shadow to a selected few squares to make the standout more than the rest of the image as some of David Hockney's photos do this.


And this is the final piece that I had created in the style of David Hockney.


Monday, 5 October 2015

Slinkachu Emulation


Slinkachu's Original Photo


My Emulation


My emulation of Slinkachu's image is not accurate as there are a few aspects I could match correctly. Firstly, I could get the same miniature figures which he has used in his photo. Also the lighting that is shown on Slinkachu's image is natural light and on the day that I took this image the lighting outside was terrible so I had to take the photos inside using artificial lighting to try and replicate it. 
Using miniature figures in this photo appeared a challenge as they weren't free standing so I had to use masking tape which is visible at the foot of the miniature.

If I was to do this emulation again I would make sure that I found the correct miniature to use and also a ladder as my emulation did not include that and also just pay more attention to detail so that I could get every aspect the same and more like Slinkachu's. Also I would try and create a way in which there could be some light source coming from inside of the camera to light up the miniature that way as that is what Slinkachu has done. Finally, I would've given my camera a clean as the dust particles show up on the outside of the camera.

Trials

These images are a few versions of the image that nearly worked but weren't as good as my final image.


I didn't use this image as firstly, it was zoomed out far and too much of the camera itself was showing when all I wanted was just the shutter section of the camera body. Also the lighting was too intense and as you can see it started to glare on parts of the camera.


With this image the lighting was too intense so again it started to glare on some parts of the camera body. Also the position of where the miniature was situated so I wasn't an accurate emulation.

I prefer my final image to trials as the lighting was correct on the miniature and camera body. Also the situation of the miniature inside of the camera was as close as I could get it to Slinkachu's. I had the settings correctly adjusted as there were settings such as aperture shutter speed and iso that still had to be changed after taking the trial shots. Finally, the blur that I added in during editing suited my final image more than it did with my trials shots.


Contact Sheets


Friday, 25 September 2015

Artist Research - Slinkachu


Slinkachu is a street artist that takes everyday objects and tiny figures and transforms them into dynamic compositions and creating surreal images and almost a second world that we don't see in our day to day life. His photography is unique as he is using objects that we would use everyday and has seen them in a different light that some people wouldn't have thought of using them for.


"The 'Little People Project' started in 2006. It involves the remodelling and painting of miniature model train set characters, which I then place, photograph and leave on the street. It is both a street art installation project and a photography project. The street-based side of my work plays with the notion of surprise and I aim to encourage city-dwellers to be more aware of their surroundings. The scenes I set up, more evident through the photography and the titles I give these scenes, aim to reflect the loneliness and melancholy of living in a big city, almost being lost and overwhelmed. But underneath this, there is always some humour. I want people to be able to empathise with the tiny people in my works." 

This is a quote from his website where he displays all of his work for all to see: http://www.slinkachu.com/bio 


Not a lot has been revealed about Slinkachu except that the is a very clever and unique photographer. He has his own way of photography and uses his 1cm tall figures to create them their own little world within our own world. Some of his pieces 'A man standing by a cash machine' lasted approximately 2 months. This means that either they're so small nobody notices them or the fact that they're so special that people just leave them for others to admire. In my opinion I think his work is incredible and I love his style and how unique his work and that every scene that he creates with these tiny figures are different from the last. His work also reminds be of the graffiti artist 'Banksy' as his style is similar as his pieces of work are unique and nothing like the last and also they get left in areas for different periods of time and are admired by all. 

Artist Research - David Hockney


David Hockney is well known for his collages and paintings of Los Angeles swimming pools and is considered one of the most influential British artists of the 20th century. He moved from London to Los Angeles in the 60s and this is where he he painted his famous swimming pool paintings. He then began working in photography creating his photo collages he called 'Joiners', where he would take several photos of the a item at different angles and heights ad would then join them together to try and create a complete image.


In addition to pools, Hockney painted the interiors and exteriors of California homes. In 1970, this led to the creation of his first 'joiner' an assemblage of Polaroid photos laid out in a grid. Although this medium would become one of his claims to fame, he stumbled upon it by accident. While working on a painting of a Los Angeles living room, he took a series of photos for his own reference, and fixed them together so he could paint from the image. When he finished he recognised the college  was an art form of itself and began to create more and more.


Hockney's early paints incorporated his literary leanings and he used fragments of poems and quotations from Walt Whitman in his work. This practice and paintings such as We Two Boys Clinging Together, which he created in 1961, were the first nods to his homosexuality in his art.


Hockney was an adept photographer, and he began working with photography more extensively. By the mid 1970s he had all but abandoned painting in favour of projects involving photography and set and costume design for the ballet, opera and theatre. In the late 1980s Hockney had then returned back to painting, primarily painting seascapes, flowers and portraits of loved ones. He also began incorporating technology in his art, creating his first homemade prints on the photocopier in 1986. The marriage of art and technology became an ongoing fascination—he used laser fax machines and laser printers in 1990, and in 2009 he started using the Brushes app on iPhones and iPads to create paintings. A 2011 exhibit at the Royal Museum of Ontario showcased 100 of these paintings.


Monday, 21 September 2015

Emulation Plan


David Hockney

This photo by David Hockney piece is called 'Walking In The Zen Garden'. There are several other images that use the same style and collage effect where there are multiple photos arranged to create a final image but each photo is taken from a different position and angle. Click on the image below to view more of David Hockney's collage work:


The equipment that would have been used for this photo would include:

Camera - I will use my Canon 550D and experiment with both a 55-200mm lens or a 18-55mm lens
Tripod - To secure the camera
Setting To Emulate - Find a suitable setting to photograph as I will now be able to find the exact location as in the image above

Editing the photo will take between several hours as this image will be hard I have to collage all of the images together and line them up so that I can create a final image that is recognisable. The shooting of this image will again take several hours as there are so many image that are going to be captured and also I will have to create contact sheets to go along with the image so I will have to take multiples of the same area of the image.

Date - I plan to take all of my images of the setting on October 3rd and 4th if needed and also to have finished editing by the 5th of October if the photoshoot goes to plan.


Slinkachu

The name of this piece by Slinkachu is called 'Overpowered' and is related to the image as the miniature that is included in the photo is an overweight superhero therefore being 'Overpowered'.


'It's a bit of a challenge trying to pin down exactly Slinkachu does. You could classify him as an installation artist, photographer, gentle provocateur, or even philosopher; each would be accurate in it's own way but even all of them, taken together, still somehow miss the whole that's bigger than all those parts.'

The equipment that would have been used for this photo would include:

Camera - I will use my Canon 550D and using a 18-55mm lens
Tin Can - To be part of the scene
Miniature - The miniature will be used to stand in front of the mirror inside of the DSLR camera
Stand - Possibly to set the camera on at the right height to keep the image crisp and to avoid any possible blur that may occur.
Lighting - I will experiment with both artificial or natural lighting

Editting the photo will take around 30 minutes as there is not a lot that needs to be done, the only editing I will have to do will be to alter the photo by using the levels, saturation to try and get my image as close to Slinkachu's. Shooting the image will take around 1 hour or 2 as I will have to find several locations that I could use and then experiment with each individual location to find the perfect location and then I will also have to set the aspects of the photo up at each location.

Date - I plan to take the photo on the 29th of September and also have it edited by the 30th of September.

Adrian Limani

The name of this piece by Adrian Limani is called 'New Bulb Has Flourished'. It is one of many images that Adrian has used a light bulb to display building, trees, flours and even boats. Click the image below and the link will take you to this collection of FineArt.


The equipment that would have been used for this photo would include:

Camera - I will use my Canon 550D and using a 18-55mm lens and a 55mm - 200mm lens
Tripod/Stand - To make the camera secure and steady to reduce blur
Light Bulb - This will be used to stick in the dirt to edit the tree into
Lighting - Again either using artificial or natural lighting to get the thing off the top of the bulb

Editting this photo will take around a day or two as I need to photoshop the tree into the light bulb but also making sure that I can get the photo identical. This means deleting the background from around the tree so that it doesn't actually look like I have photoshopped the tree into the light bulb but that the tree has actually grown inside of the bulb. Taking the photos will also take around 1 day as I will have to find a perfect location to take the photo of the bulb in the soil and also because I will have to find a tree that is almost identical to the one in this photo as it will show that I emulate other photographers work well.

Date - I plan to take the photo of the light bulb and the tree by the 7th and 8th of October and also to have finished editing by the 10th of October.